
How Upcycling Can Save Your Furniture
A Step-by-Step Guide to Reviving a Sad Little Bookcase.

My house has its fair share of random items of furniture – especially bookcases. They’ve evolved, shifting from room to room over the years and are now held together with layers of old paint. If I were to scratch beneath the surface, I would find the colour of my daughter’s baby bedroom for sure. But every time they move – they get a new lease of life, a new story, a fresh coat of paint and keep one foot out of the furniture graveyard.
So, let’s talk about upcycling, the ultimate glow-up for your home and the planet. You most likely have an old bookcase sitting in your garage, collecting dust and looking like it’s one sneeze away from collapsing. It’s not trash—it’s a treasure waiting to happen, especially if it’s made from solid wood and not just plywood and veneer. Upcycling is like giving your furniture a second chance at life, and honestly, it’s kind of addictive. Mine are like cats with at least nine lives. Plus, it’s a win for the environment, your wallet, and your Instagram feed.
Here’s the deal: when you upcycle, you’re keeping excellent materials out of landfills, reducing the demand for new resources, and cutting down on the carbon footprint of manufacturing new furniture. It’s like recycling but with way more personality. Your battered old shelf can become the star of the show. If you visited a stately home, you’d find 200-year-old painted furniture fit for a queen – now it’s time to get some heirlooms of your own.
So, grab your paintbrush, put on your favourite playlist, and let’s breathe new life into that sad little bookcase. I’ll walk you through the process step by step, with plenty of encouragement along the way.

Step 1: Assess the Situation (aka Give Your Bookcase a Pep Talk)
First things first: take a good, hard look at your bookcase. Is it wobbly? Scratched? Stained with what you hope is coffee but probably isn’t? Don’t panic. Most issues are fixable with a little TLC or a sander.
Check for structural damage. Are the shelves sturdy? Are the legs about to give out? If it’s just a little wobbly, tighten the screws or add some wood glue to reinforce the joints. If it’s beyond repair, consider salvaging the wood for another project. (Yes, you’re basically a furniture surgeon now.)
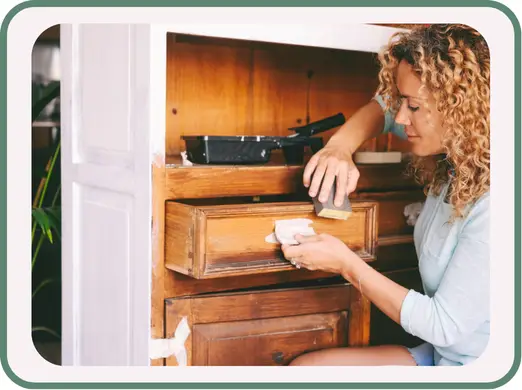
Step 2: Strip It Down (No, Not Like That)
Before you can work your magic, you need to prep the bookcase. Start by removing any hardware—drawer pulls, knobs, or hinges. If you’re planning to reuse them, give them a good scrub with soap and water or a vinegar solution. If they’re beyond saving, treat yourself to some new ones. Hardware is like jewellery for furniture, and it can totally transform the look.
Next, thoroughly clean the bookcase. Dust it, wipe it down with a damp cloth, and use a mild cleaner to remove any grime. Think of it as a spa day for your bookcase.
Step 3: Sand It Like You Mean It
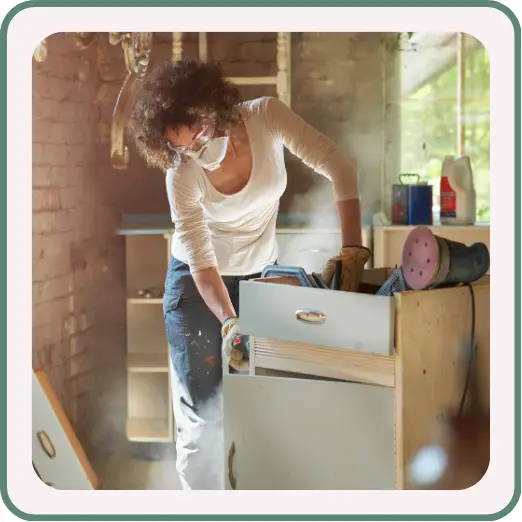
Now, it’s time to get down to business. Sanding is the key to a smooth, professional-looking finish, so don’t skip this step. Grab some sandpaper (medium grit for starters, then fine grit for finishing) and get to work. Buy or borrow a power sander if you can to save your poor fingers.
Focus on removing any old finish, smoothing out scratches, and roughing up the surface so your paint or stain will stick. If your bookcase has intricate details, use a sanding sponge or a piece of folded sandpaper to get into those nooks and crannies.
Pro tip: Wear a mask and do this outside if possible. Sawdust is not a good look, and neither is coughing like you’ve just run a marathon.

Step 4: Paint or Stain (aka the Fun Part)
Here’s where you unleash your inner artist. You need to decide whether to paint or stain your bookcase. Paint is excellent for a bold, modern look, while stain lets the natural beauty of the wood shine through. If you have an expensive wood like teak or walnut, then try to bring out their quality rather than bury it.
If you’re painting:
- If you have visible wood with knots, start with a knot treatment. This will prevent the paint from turning yellow or forming those horrid little rings.
- Follow with a primer to ensure even coverage and help the paint adhere to the surface.
- Choose high-quality paint in your desired colour. Satin or semi-gloss finishes are durable and easy to clean.
- Use a brush for edges and corners and a roller for larger surfaces. Apply thin, even coats, and let each coat dry completely before adding the next.
- Make sure you have a ventilation source, especially if you’re using an oil-based paint
If you’re staining:
- Wipe the stain onto the wood with a cloth or brush, following the grain.
- Let it sit for a few minutes, then wipe off the excess with a clean cloth.
- Apply a second coat if you want a deeper colour, and finish with a clear sealant to protect the wood.
Step 5: Add Some Personality (Because Basic Is Boring)
Now that your bookcase is looking fresh, it’s time to make it truly yours. Here are a few ideas to take it to the next level:
- Line the back: Add some wallpaper, fabric, or even a bold paint colour to the back panel for a pop of personality.
- Swap the hardware: Upgrade the knobs or handles with something sleek, vintage, or quirky.
- Stencil a design: Use a stencil to add a geometric pattern, floral motif, or whatever speaks to your soul.
- Apply furniture stickers to add a design element and some colour.
- Add lighting: Attach some battery-operated LED strip lights to the shelves for a cosy bookstore vibe.
Step 6: Style It Like a Pro
Your bookcase is no longer a sad, forgotten relic—it’s a statement piece. Now, it’s time to style it. Here’s how to make it look like it belongs in a magazine. For more detailed help, check out the video below for some top tips.
- Mix books with decorative objects (vases, plants, candles, etc.) for visual interest.
- Play with height and texture to create balance.
- Leave some space—it’s not a Tetris board.
- Add a personal touch, like framed photos or a quirky collectable.
Why This Matters (Besides Looking Fabulous)
By upcycling your bookcase, you’re not just creating something beautiful—you’re making a difference. You’re keeping furniture out of landfills, reducing the demand for new resources, and cutting down on the environmental impact of manufacturing. Plus, you’re proving that sustainability can be stylish.
So, the next time you’re tempted to toss something old, remember: with a bit of creativity and effort, you can turn it into something extraordinary. And honestly, isn’t that what life’s all about?
Now go forth and upcycle like the eco-goddess you are. Your bookcase (and the planet) will thank you. 🌍✨